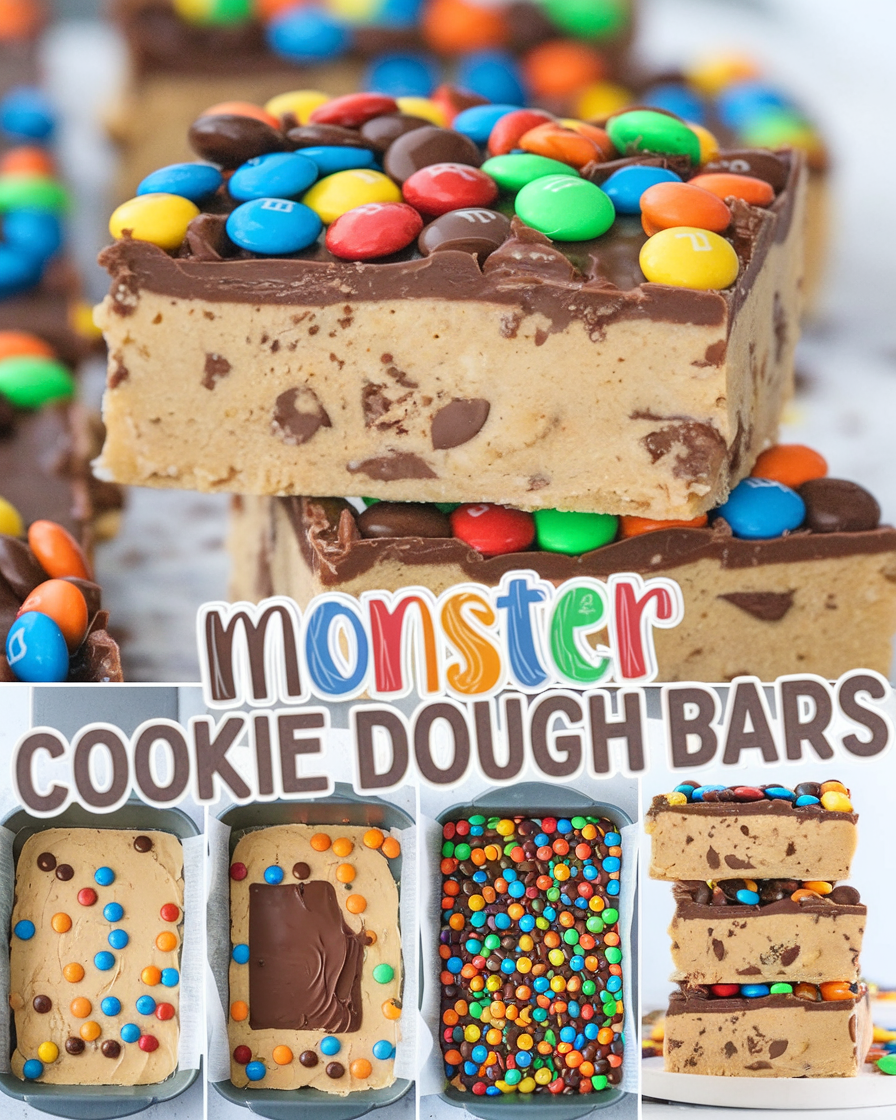
If you’re a fan of cookie dough and love no-bake treats, these Monster Cookie Dough Bars are about to become your favorite dessert! Packed with colorful candies, chocolate chips, and a rich layer of chocolate on top, these bars are as fun to eat as they are to make. Best of all, they’re completely safe to eat because they don’t contain eggs, and the flour is heat-treated to ensure food safety. Perfect for parties, bake sales, or just a sweet indulgence at home!
Why You’ll Love Monster Cookie Dough Bars
- No-Bake: You don’t need to turn on the oven for this recipe, making it perfect for hot days or quick desserts.
- Safe to Eat: Unlike traditional cookie dough, this version is made without eggs and with heat-treated flour, so it’s completely safe to enjoy raw.
- Fun and Colorful: With M&Ms and chocolate chips mixed in, these bars are visually appealing and great for kids’ parties or festive occasions.
- Customizable: You can switch up the candies, add peanut butter, or mix in other toppings like sprinkles for endless variations.
Ingredients
To make these delicious Monster Cookie Dough Bars, you’ll need the following ingredients:
- 2 1/2 cups all-purpose flour (heat-treated, see instructions below)
- 1 cup unsalted butter (softened)
- 1 cup brown sugar (packed)
- 1/2 cup granulated sugar
- 2 tsp vanilla extract
- 1/4 cup milk
- 1/2 tsp salt
- 1 1/2 cups mini chocolate chips (or regular if preferred)
- 1 cup M&Ms
- 2 cups chocolate chips (for the topping)
- 2 tbsp coconut oil (or butter for the topping)
Step-by-Step Instructions
1. Heat-Treat the Flour
Since this recipe uses raw flour, it’s important to heat-treat it first to eliminate any bacteria. Preheat your oven to 350°F (175°C). Spread the flour on a baking sheet in an even layer and bake for 5-7 minutes, stirring halfway through to ensure it’s evenly treated. Let the flour cool completely before using it in the recipe.
Tip: Make sure the flour doesn’t brown while baking. You’re just heating it to kill any harmful bacteria.
2. Cream the Butter and Sugars
In a large mixing bowl, cream together the softened butter, brown sugar, and granulated sugar using a hand mixer or stand mixer until light and fluffy. This should take about 2-3 minutes.
3. Add Vanilla, Milk, and Salt
Once the butter and sugars are well combined, add the vanilla extract, milk, and salt. Mix until everything is smooth and well incorporated.
4. Mix in the Flour
Gradually add the heat-treated flour to the wet mixture, mixing on low speed until a thick, dough-like consistency forms. The mixture should resemble regular cookie dough but be slightly softer.
5. Fold in the Chocolate Chips and M&Ms
Using a spatula, gently fold in the mini chocolate chips and M&Ms, distributing them evenly throughout the dough. Reserve a few M&Ms for topping if you like.
6. Press the Dough into a Pan
Line an 8×8-inch baking pan with parchment paper, leaving some overhang on the sides for easy removal later. Press the cookie dough evenly into the pan, making sure it’s nice and compact.
Pro Tip: Use a spatula or the back of a spoon to press the dough down evenly. You can also use your hands to gently smooth it out.
7. Make the Chocolate Topping
In a microwave-safe bowl, combine the chocolate chips and coconut oil. Microwave in 30-second intervals, stirring between each until the chocolate is fully melted and smooth.
Alternative: If you don’t want to use a microwave, you can melt the chocolate and coconut oil over a double boiler on the stove.
8. Spread the Chocolate Topping
Pour the melted chocolate over the cookie dough layer and spread it evenly with a spatula. Scatter any reserved M&Ms over the top for decoration.
9. Chill the Bars
Place the pan in the refrigerator and let the bars chill for at least 2 hours, or until the chocolate topping is fully set and the dough is firm.
10. Slice and Serve
Once the bars are chilled and set, use the parchment paper to lift them out of the pan. Slice into squares or bars and serve!
Storage Tip: Store any leftover bars in an airtight container in the fridge for up to one week. You can also freeze them for up to 3 months.
Tips for Perfect Cookie Dough Bars
- Heat-Treat the Flour: Don’t skip this step! Raw flour can contain harmful bacteria, and heat-treating ensures the bars are safe to eat.
- Use Room Temperature Butter: Softened butter blends more easily with the sugars and helps create a smoother dough.
- Customize the Toppings: Try swapping M&Ms with peanut butter cups, Reese’s Pieces, or your favorite candy. You can also add sprinkles for a fun twist!
- Let Them Set: For clean, sharp slices, make sure to let the bars chill completely before cutting. If you’re in a rush, pop them in the freezer for about 30 minutes.
Recipe Variations
Looking to mix things up? Here are a few fun variations you can try with this recipe:
- Peanut Butter Monster Bars: Add 1/2 cup of peanut butter to the dough for a nutty twist.
- Gluten-Free Cookie Dough Bars: Substitute the all-purpose flour with gluten-free flour to make this recipe gluten-friendly.
- White Chocolate Lovers: Instead of the classic chocolate chips, mix in white chocolate chips or a combination of both for an extra-sweet treat.
- Oreo Cookie Dough Bars: Fold in chopped Oreos instead of M&Ms for a cookies-and-cream-inspired version.
How to Serve Monster Cookie Dough Bars
These bars are rich and decadent, making them the perfect treat for special occasions. Here are a few ideas for serving them:
- At Parties or Potlucks: Bring these colorful bars to your next gathering – they’re a guaranteed hit with kids and adults alike!
- After-School Snack: Cut them into smaller, bite-sized squares for a fun snack that’s perfect for kids.
- Birthday Treats: Serve alongside ice cream for an indulgent birthday dessert that will wow your guests.
Storage and Freezing Tips
- Refrigeration: Store leftover cookie dough bars in the refrigerator in an airtight container for up to one week. Keeping them chilled will help maintain their texture.
- Freezing: These bars freeze well! Simply wrap each bar individually in plastic wrap and store them in a freezer-safe bag or container for up to 3 months. Thaw in the fridge overnight or at room temperature for about 30 minutes before serving.
Nutritional Information (Per Serving)
Here’s a rough estimate of the nutritional breakdown for one bar:
- Calories: 350 kcal
- Fat: 18g
- Carbohydrates: 45g
- Protein: 4g
- Sugar: 30g
- Fiber: 1g
- Sodium: 120mg
Note: Nutritional information may vary depending on the specific brands and ingredients used.
Frequently Asked Questions (FAQs)
1. Can I make these bars dairy-free?
Yes! You can easily make these bars dairy-free by substituting the butter with a plant-based alternative and using dairy-free chocolate chips.
2. Is it safe to eat raw cookie dough?
Normally, raw cookie dough contains eggs and untreated flour, which can pose a risk of foodborne illness. However, this recipe is safe to eat because it uses no eggs and heat-treated flour, making it completely safe to enjoy!
3. What if I don’t have M&Ms?
You can use any type of candy-coated chocolate, or simply increase the amount of chocolate chips. You can also get creative and add chopped nuts, sprinkles, or crushed cookies.
4. Can I skip the chocolate topping?
The chocolate topping adds an extra layer of indulgence, but if you prefer, you can skip it. The cookie dough bars will still be delicious on their own!
Flavor Profile
- Sweet and Rich: These bars are sweet with the perfect balance of butter, sugar, and chocolate.
- Buttery and Creamy: The cookie dough base is soft, creamy, and melt-in-your-mouth delicious.
- Crunchy and Chewy: With M&Ms and chocolate chips mixed in, you’ll get a satisfying crunch in every bite.


